
Although there are a few weeks till the big day, Christmas will be here before you know it!
With that in mind, as well as getting your Christmas shopping all done and dusted, it’s time you start thinking about decorating your home…or office…or both! Now, you can just head to the shops and pick up some tinsel and a tree, or you can have some fun with friends and family and create your very own handmade Christmas decorations. As we are huge fans of handmade gorgeous things, we decided to create our own this year.
We’ve scoured the web to find some amazing DIY Christmas decoration ideas and after trying them out, we wanted to share some of our favourites with you. These Christmas DIY decoration ideas are simple and affordable and can be used by the whole family. So, here are our top 6 DIY Chistmas decorations!
Waterless Christmas Snow Globes 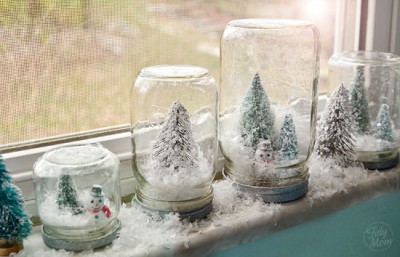
What you will need: Glass jars in various sizes, artificial snow, hot glue gun and glue, assorted mini Christmas trees, snowmen and other Christmas characters, spray adhesive (optional), glitter (optional), silver or white spray paint
We found this fun tutorial on tidymom.net. This is a fun and easy DIY project, which make great table centre pieces, gifts or decorations to dot around your home during the festive season. Pretty much all of the components can be picked up at your local craft shop or even a pound shop. First, remove the lids from the jars and spray paint them with your chosen colour. You can really have any colour you want, but silver or white works particularly well. Next, take your little Christmas characters and using your hot glue, stick them onto the lid. If you want to make the snow globes extra Christmassy, apply a little spray adhesive and then sprinkle them with glitter.
Next, fill your glass jars with a little bit of fake snow and a touch of glitter if you fancy. Finally, screw the lids back on and have fun shaking the jars to let the snow fall gently around your Christmas characters. So pretty and so simple!
Glitter Christmas Light Bulbs 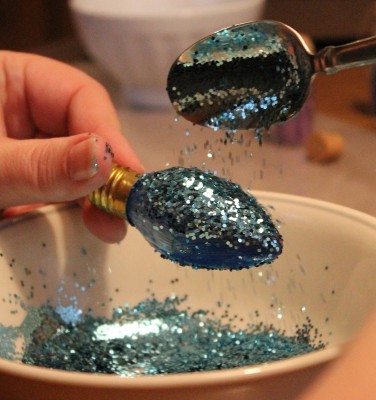
What you will need: light bulbs – oval shaped ones work best, wax paper, Mod Podge, glitter (colours up to you!), snowflake stickers (or other Christmas themed stickers
This is another super easy Christmas decoration tutorial, which we found over at myprojectsandfinds.blogspot.co.uk. To avoid glitter going everywhere, spread a sheet of wax paper out onto your work surface. Next, paint your light bulbs with a layer of Mod Podge, or other sealer glue. Pour your glitter into a bowl and using a spoon, sprinkle the glitter onto your light bulbs. Decorate as many as you want and when they are done, set them down on the wax paper to dry and set. Leave some of your bulbs white and simply stick on your Christmas themed stickers, sporadically.
Now, either display the bulbs in pretty bowls around the home, or tie some string or ribbon around the stem and hang them from your tree! Simple!
Bottle Cap Snowman Ornaments 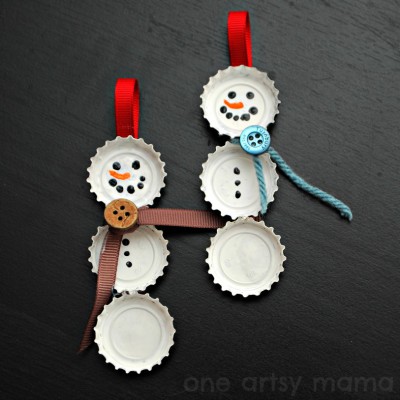
What you will need: bottle caps, acrylic paint in white, black, orange and red, paintbrushes, ribbon, hot glue gun and glue, buttons, scissors, glitter (optional)
To make these cute little snowmen ornaments, which we found at oneartsymama.com, you need to start by painting the inside of the bottle caps white. This might need a few layers. Next, glue 3 bottle caps to a piece of ribbon. pop a bit of glue in between each bottle cap to hold them together. Create a loop at the top of the ribbon and glue in place. Now paint the snowmen’s eyes, nose, mouth and buttons. You can add a little bit of glitter if you want to create a bit more sparkle. Finally, tie a little length of ribbon or yarn between the first and second bottle cap, to create a cute little scarf. How easy was that?
CD Mosaic Christmas Ornaments 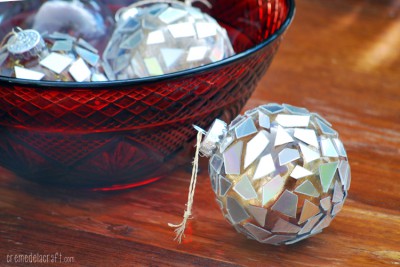
What you will need: Glass baubles, old CDs (with silver backing), ribbon, scissors, glue gun
This unique and fun idea for creating your own DIY Christmas ornaments, which we spotted over at cremedelacraft.com. First you need to cut your CDs up into various small shapes and sizes. You need a good and sharp pair of scissors to do this! Once done, dot a small amount of glue onto the ornament and press a piece of the CD firmly onto it, shiny side facing up. Be sure to clean any remaining glue as you go. Keep gluing away until the ornaments are covered in bits of CD. Finally insert some ribbon into the glass ornaments so no one will be able to see the glue dots or opposite sides of the CD pieces.
You’re done! Hang them on the tree and watch them catch the light.
Snowman Front Door 
What you will need: Black and orange construction paper, circular templates, scissors, white tack or similar, ruler, Christmas wrapping paper
We found this adorable snowman front door over at thecreativestamperspot.blogspot.co.uk and we couldn’t wait to put it into action! Probably our most simple DIY Christmas tutorial, but definitely one of the most effective. Keep in mind, this only works if you have a white front door, but you can also apply the same idea on your fridge! Simply cut out large circles from the black construction paper for the snowman’s eyes, then 5 or so smaller circles for his mouth and 3 or 4 more for his buttons. Using a ruler, cut out a triangle from the orange construction paper to make your snowman’s carrot nose. Using white tack, stick all of the components onto the door. Finally, take some of your festive wrapping paper and cut out a scarf for your snowman and stick that on the the door.
Voila! Instant Christmas cheer.
Gum Drop Pomander Ornaments 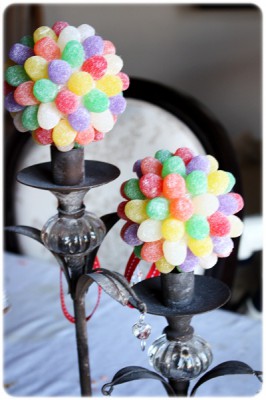
What you will need: styrofoam balls, ribbon, straight pins, hot glue gun and glue, gum drops (or similar sweets), scissors
We found this cute idea at myblessedlife.net and we just fell in love with it. Start by applying a dab of glue onto the foam ball and attaching the ribbon with a pin through the hot glue. Loop the ribbon around and then glue and pin it in place so you have a loop, held in place by the pin and the glue. Now the fun bit. Begin gluing the gum drops in place on the foam ball, alternating the colours until the entire ball is covered (try not to eat too many). And that is pretty much it! Once your foam balls are covered in pretty, colourful sweeties, you can choose to hang them from the Christmas tree, or place them in candle holders or piled up in bowls around the room…the choice is yours!
We hope you have enjoyed our top 6 DIY Christmas decoration ideas. If you have a go at any, send us a photo on our Twitter or on our Facebook page and be sure to share your favourite DIY Christmas tutorials below.
Bags of Love x