
It’s almost that time of year again…the goblins and ghouls are approaching…yes, it’s Halloween time!
OK, we admit it, we may technically be “grown-ups” here at Bags of Love, but we do have a little bit of a soft spot for Halloween. I mean, come on. Sweets, dressing up, costume parties…who says it should be just for kids?
We’ve started gathering costumes and scouring the webs for fun DIY Halloween decoration ideas to get our office all spooky and set for October 31st and we thought we would share some of our favourite ideas with you!
Black Glitter Pumpkin 
What you will need: pumpkin, transfer paper, pencil, computer, printer and printer paper, scissors, tape, 1.0 liner artist brush, glue, wax paper, paper towels, black glitter, bowl, spoon
We found this fun and super easy idea over at www.hgtv.com. We all love the tried and tested method of carving a pumpkin to create a Jack O’Lantern but this year, why not try something a little different? Head down to the shops and find yourself a lovely pumpkin or two and pick up any of the above bits, which you don’t have in the house.
First thing you need to do is choose a Halloween themed design, scale it to fit your pumpkin and print it onto printer paper. Cut off any excess paper and also cut a piece of transfer paper to roughly the same size. Tape both pieces onto the pumpkin. Gently trace over the graphic with a pencil, checking the tracing occasionally. When finished, you should be left with a nice outline of your image on the pumpkin’s surface.
Time to bring out the glue and glitter! Place the pumpkin on a large piece of wax paper, to catch any excess glue or glitter spillage. Grab your glue and a brush and apply the glue over the transferred lines of your design. If you spill any glue, just wipe it away with a moist paper towel.
Pour your glitter into a bowl and use a spoon to scatter the glitter over the glue. Make sure the entire glued area is coated in glitter. Then, feel free to add any extra sparkly bits, such as a decorative border or the words “Happy Halloween.”
Spider’s Nest Luminaries 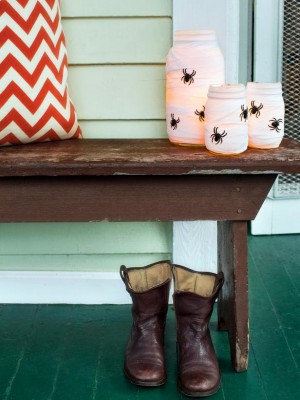
What you will need: Kilner jars or equivalent – of different sizes, white medical gauze or cheesecloth, glue, pins, tea lights or pillar candles, plastic spiders
This is a very easy yet very effective Halloween decoration idea. All you need is some of those Kilner jars, or any glass jar to be honest! Plus some glue, pins, medical gauze (bandages), tea lights or pillar candles and some plastic spiders. You can normally get bags of them from pound shops.
Take your glass jars and your gauze and start wrapping the gauze tightly around the jar, covering the entire jar from top to bottom. Once it is fully wrapped, you will need to secure the gauze to the jar. The best way to do this is either with some discreet pins or glue. Make sure the gauze is tightly wound, as any unravelling will look a bit rubbish!
Next, take your little plastic spiders and glue them all around the jar, making it look like they are crawling in and out of it. Finally, insert a tea light or pillar candle into your jar and light it, to create an eerie glow from within. Repeat the process with jars of various sizes, until you get the look you want. These look amazing on the fireplace, on a front porch or decorating a window sill.
Halloween Lamp Shade 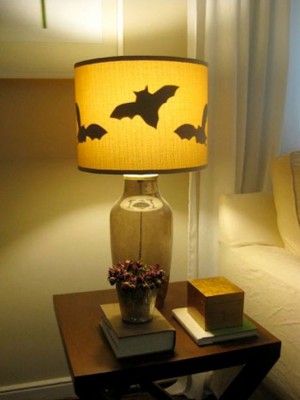
What you will need: a lamp with easily accessible lamp shade, construction paper, bat template, scissors, double sided sticky tape
This easy peasy decoration idea was found over at www.listotic.com. All you need is a lamp with a shade, scissors, construction paper and a bat template – or your own artistic skills, if you can draw!
Get yourself some construction paper and either a bat template or sketch an outline of a bat onto the paper. Do a few of these, as they need to go all the way around the lamp. Once drawn, cut your bats out.
Next, grab some double sided sticky tape and apply it to your bats, then simply stick them on the internal side of the lampshade. Now switch your lamp on and you will see a spooky bat silhouette on your lamp shade!
DIY Lawn Ghosts 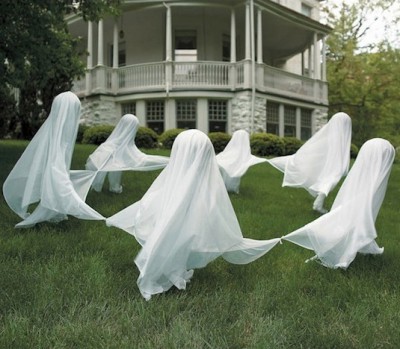
What you will need: styrofoam balls, garden stake or similar sticks, white fabric – cheesecloth, organza or similar – lightweight fabric is best.
These creepy garden decorations are a sure way to spook any trick or treaters! Poke the styrofoam ball with the garden sticks and place them in a circle or whatever formation you want in the garden.
Next, get your fabric and drape it over each ghost. Tie the corners of the fabric together and for extra security, you can poke little white push pins through the fabric and balls, just to make sure the fabric doesn’t blow away!
Now watch as your little ghosts dance in the wind.
Glowing Eyes Hidden In The Bushes 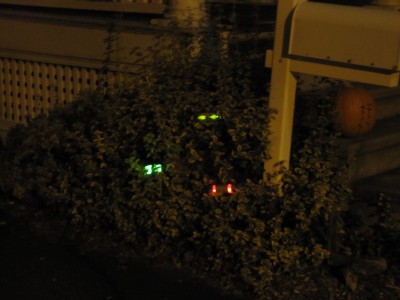
What you will need: cardboard tubes (from toilet or kitchen rolls) plastic glow sticks
We found this fun DIY decoration idea over at www.diynetwork.com. This simple yet very effective Halloween decoration will have people running from your garden! All you need to achieve this spooky effect is a few cardboard tubes, some scissors and plastic glow sticks. You can normally find glow sticks in the party section at pound shops, so grab a few packets, as they are always useful when it comes to DIY and craft projects.
Take your cardboard tubes and cut evil eye shapes into them. The more menacing and scary the better! When you have cut out your eye shapes, simply take a glow stick and place it inside the tube. You can add more than one, if you want your eyes to really glow brightly! To secure the sticks, just add a bit of tape to stick them in place.
Now all you need to do is place them around the bushes in your garden, or in your trees and wait for nightfall, when those evil eyes will glow eerily and spook anyone who walks past!
We hope you’ve enjoyed these fun and easy DIY Halloween decoration ideas. If you try any out, or if you have some ideas you would like to share with us, just post them below in the comments.
Happy Halloween!
Bags of Love x